QuoteMagic! is
intended to be used in partnership with PricePoint and PricePoint
Device Desktop. Its purpose is to provide easy and efficient invoicing,
customer signature capture and payment handling on the tablet.
Invoice receipt is emailed to customer. Invoice, payment, customer
information, and job location data is all sent to the office via
email.
All the data in the app originates from the PDD during the Load
Device process: Customers, customer notes, job locations, sales
tax rates, Invoice and customer numbering ranges and menu pricing.
QuoteMagic! has 5 tabs: Workspace, Menu Pricing, Appointments, Pricebook and Completed Documents. The tabs are found at the bottom of the app window and represent the 5 basic jobs that the app can perform.
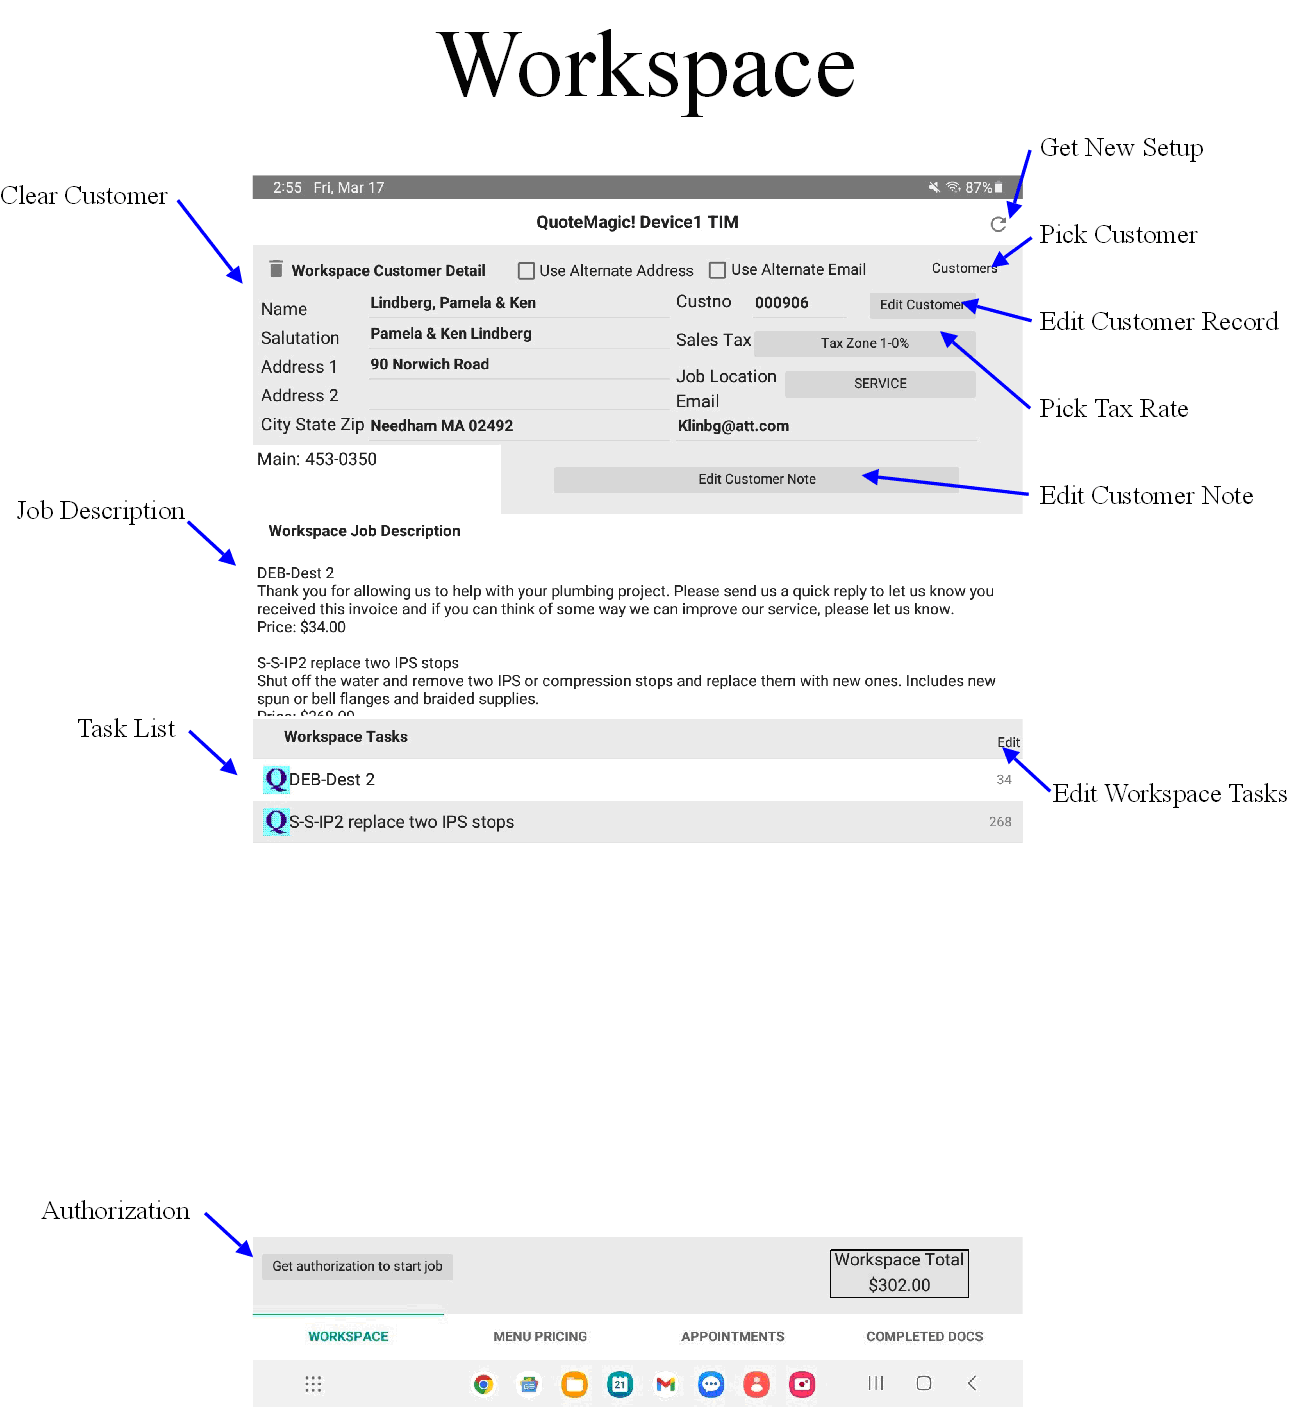
This tab represents a pre-invoice waiting for authorization and approval. The Customer info shows at the top along with sales tax rate and job location. In the middle you'll see the Job descriptions that are built from the joblinx text linked to each QuoteMagic! task and their prices. Below that are the tasks that have been added to the workspace.

Customers - Search
for and pick an existing customer or add a new one.
Sales Tax - Pick the sales tax rate. Default rate comes
from customer info.
Job Location - Pick an existing job location or create
a new one.
Edit Customer Note - Make changes to the customer note.
Clear Customer - ![]() Clear
customer data from workspace.
Clear
customer data from workspace.
Clear Tasks - ![]() Clear
all tasks.
Clear
all tasks.
Edit Tasks - ![]() Allows deletion of a single task.
Allows deletion of a single task.
Get Authorization - Starts signature capture for authorization.
Get Approval - Starts signature capture for job approval
and invoice creation.
Get New Setup -  Causes running app to look again in app documents
folder and restart using contents after load.
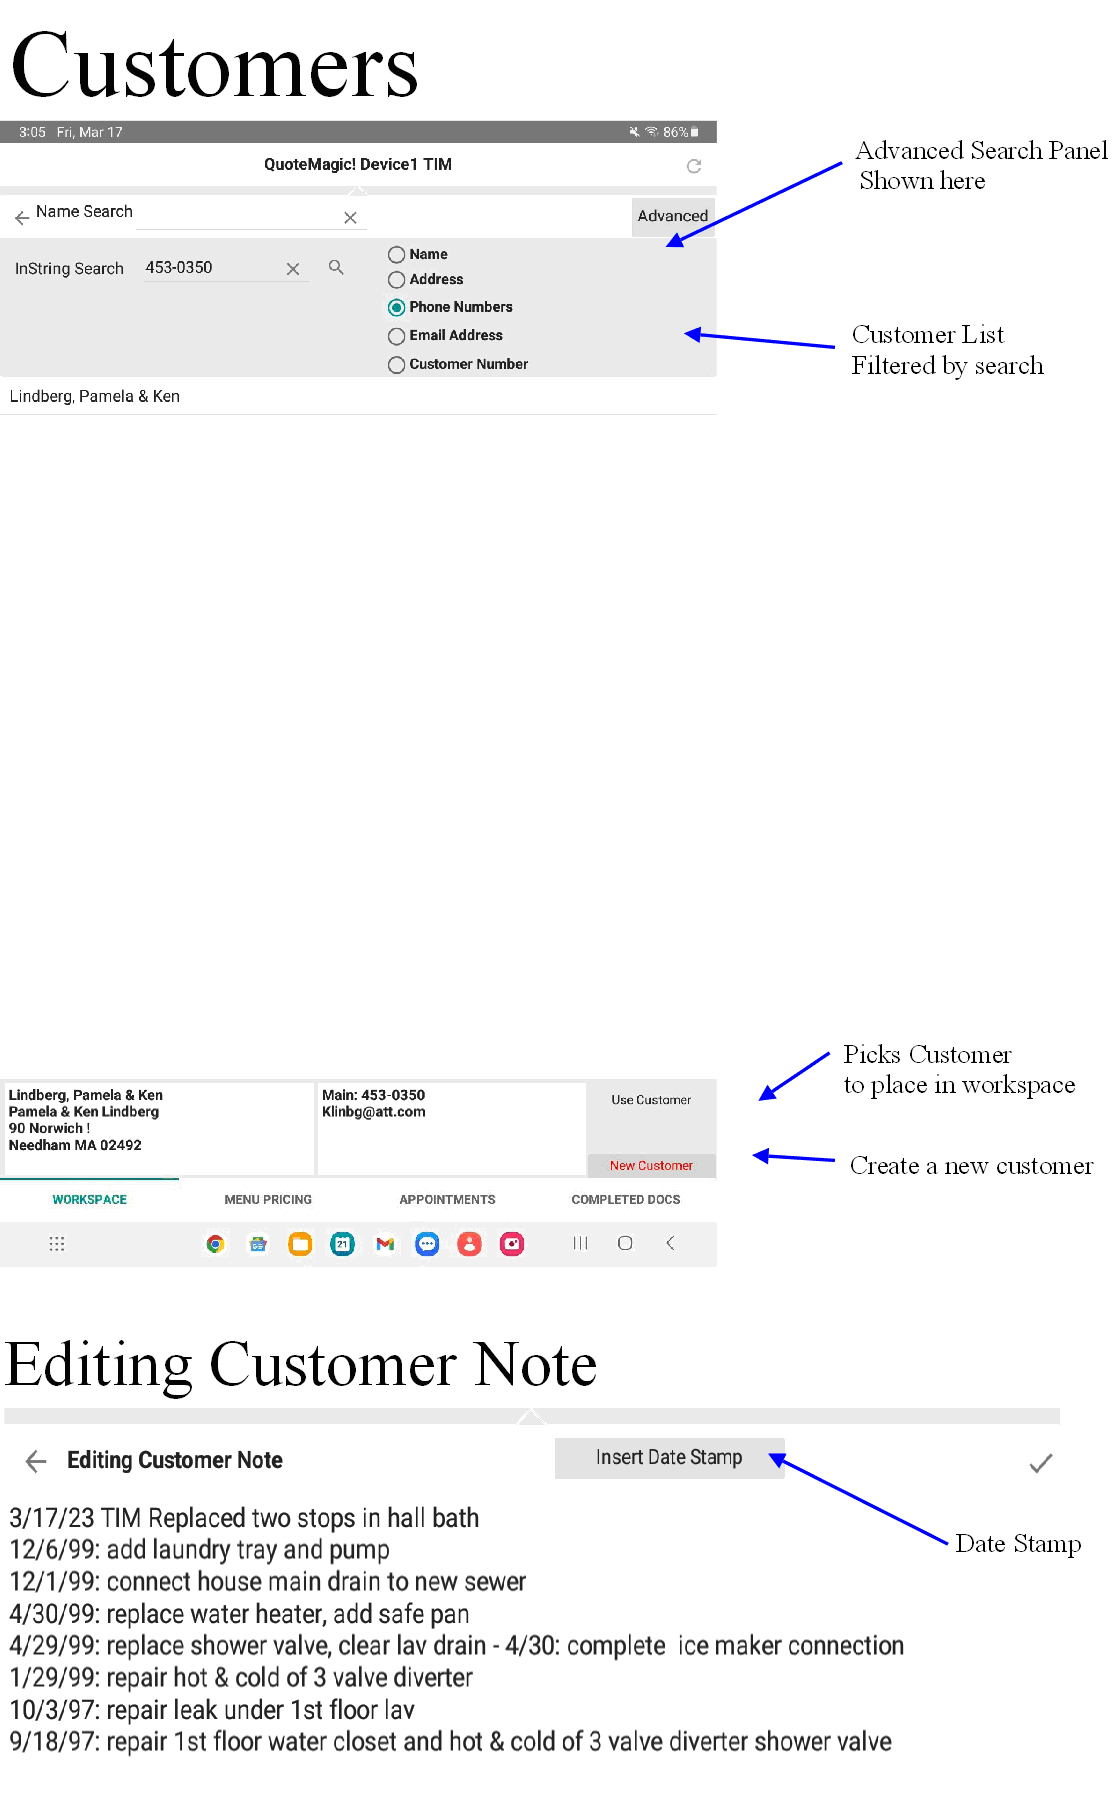
Customer Pop up: Alpha search for a customer name using Name Search. Or tap Advanced to open up in-string search by name, address, phone, email or customer number.
Edit Customer Note:
Tap Insert Date Stamp to add the date and your name to the top
of the customer note. Tap done to save the changes or tap Back
to cancel changes.
Get Authorization: Ask customer to tap the Agree checkbox so that it is checked, sign in signature box and tap Accept. Clear the signature by tapping Clear. Tap Back to cancel authorization.
Note: QuoteMagic! does not require a signature. If desired, the process can continue without a signature by tapping Accept.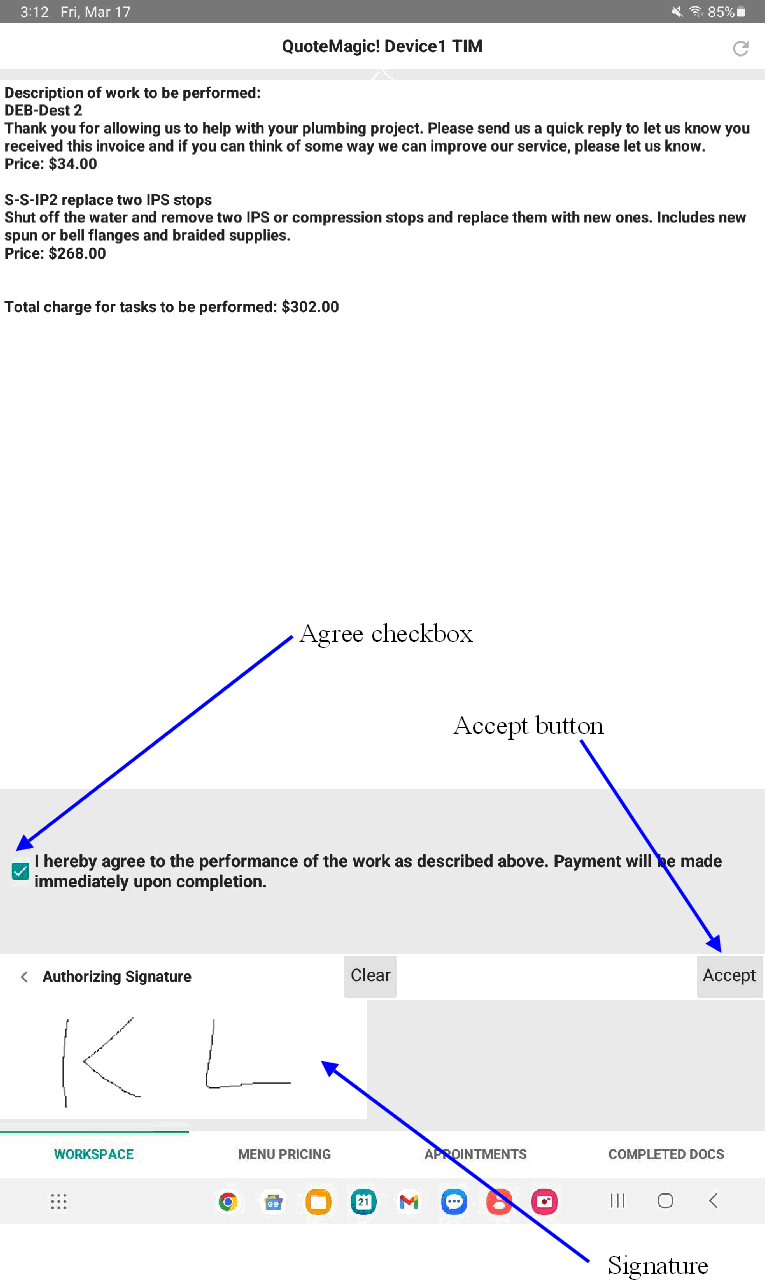
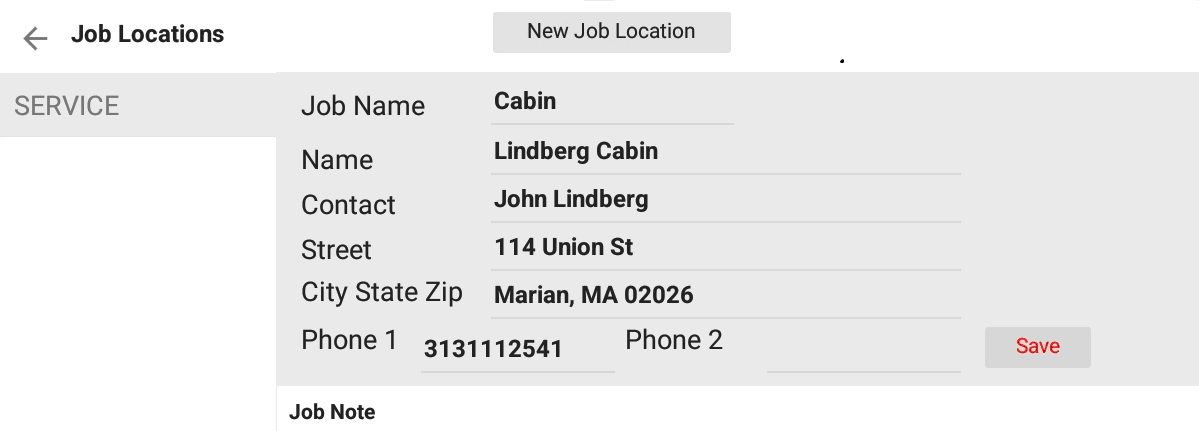
Job Location: Pick an existing job location from the left column and tap Done. Tap edit to make a change to the details of the job location. Tap New Job Location to create a new one. Tap Save after changes are made. Tap Back to cancel changes.
The menu pricing system shown in this tab originates
from the QuoteMagic! flat rate book in your PricePoint software.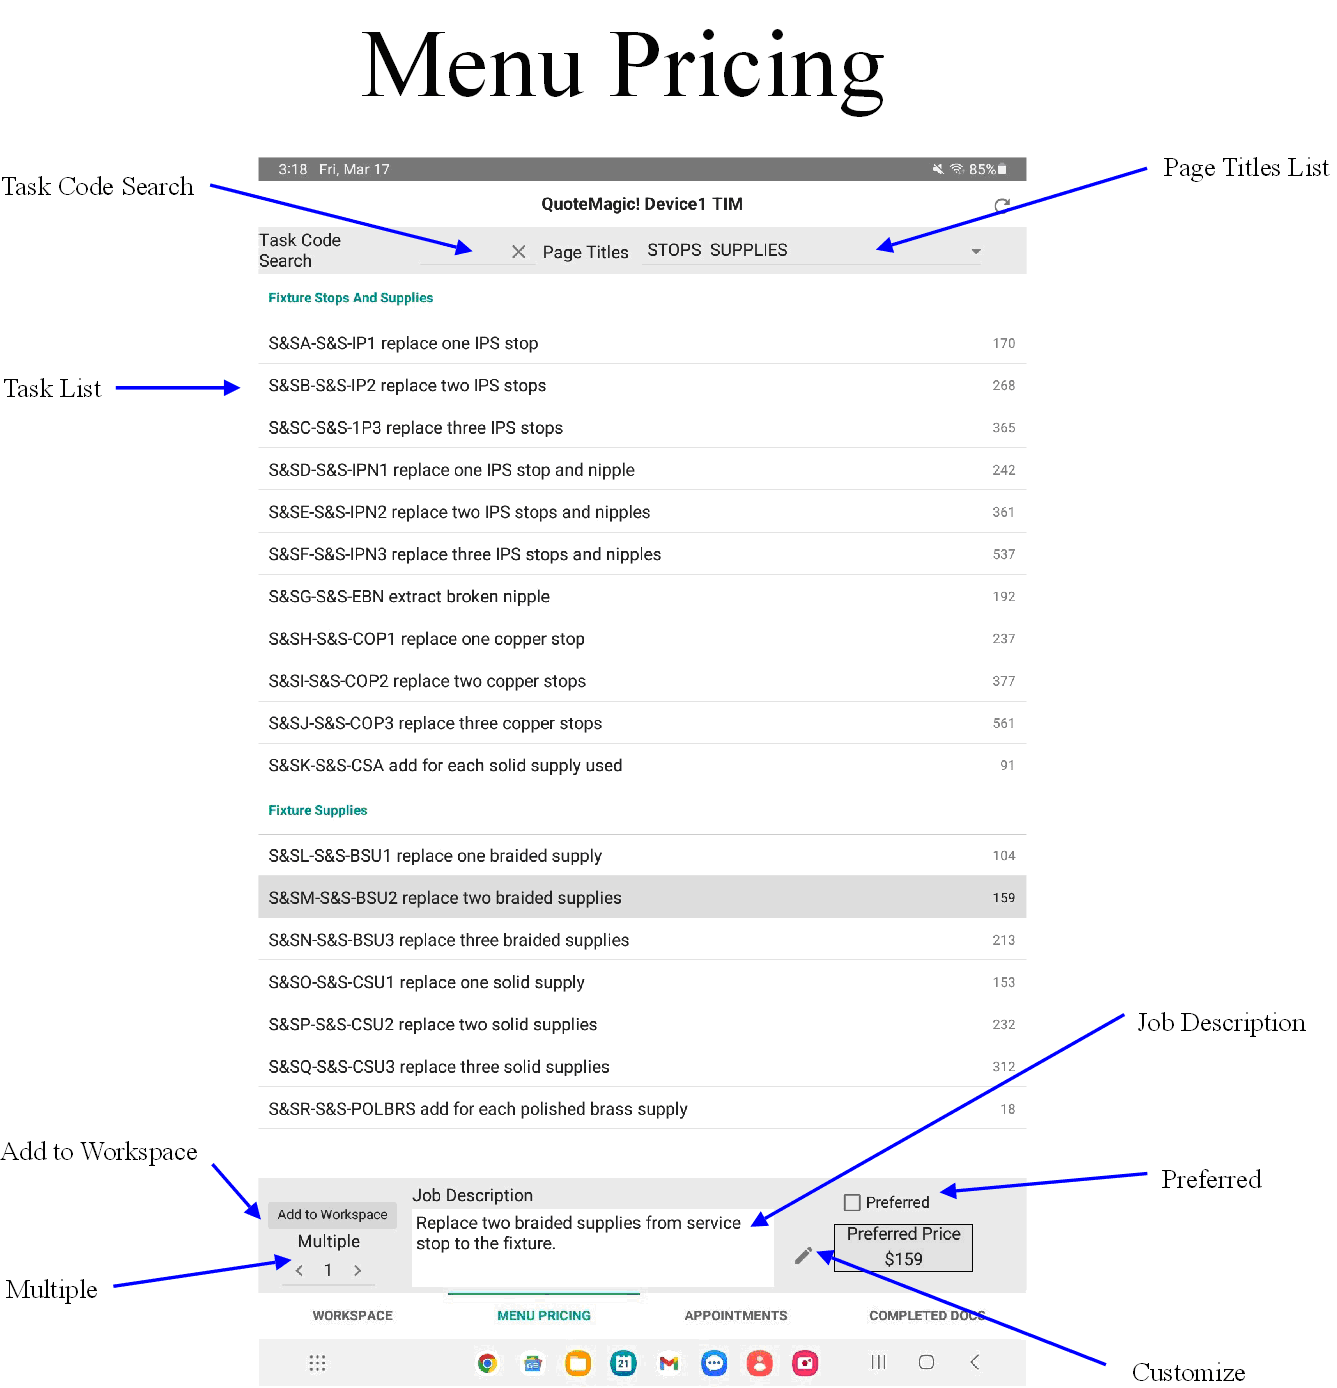
Task Code Search
- Finds a task by Task code.
Page Titles List - Scroll through an alphabetical list
of page titles. Tap Done to display.
Job Description - Displays the joblinx text linked to the
task.
Preferred - Check box to use preferred price.
Multiple - Displays number of tasks to add to workspace.
Increase/decrease by tapping right/left arrows on sides of control.
Customize - Displays Custom task dialog. Change task price
and job description text.
Add to Workspace - Add selected task to workspace using
the Multiple displayed.
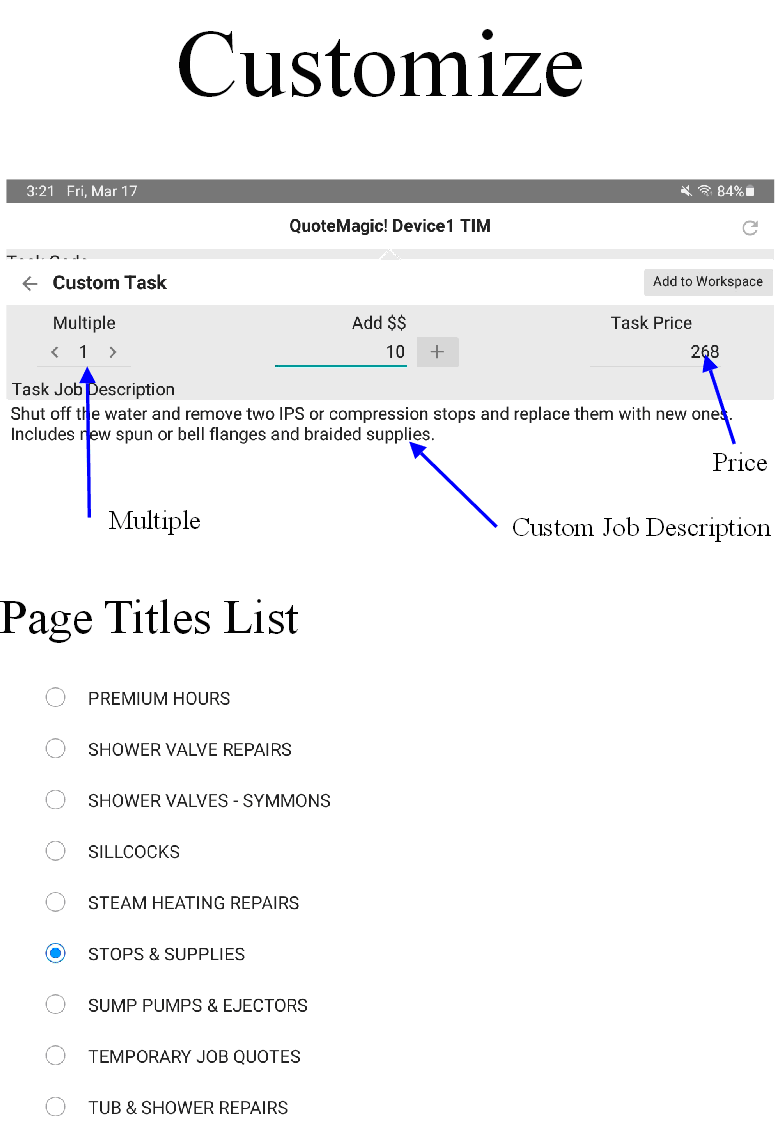
Customize Task - Change the price of the selected task by tapping Price box. Add money to the task price by typing in the Add$$ box and tapping +. Increase/decrease the Multiple added to the workspace by tapping left/right arrows on sides of control. Change task job description by adding changes in the text box. Tap on Add to Workspace to add the customized task to the workspace. Tap Back to cancel the custom task.
Appointments originate from Schedule Message
emails sent from the office to the tablet.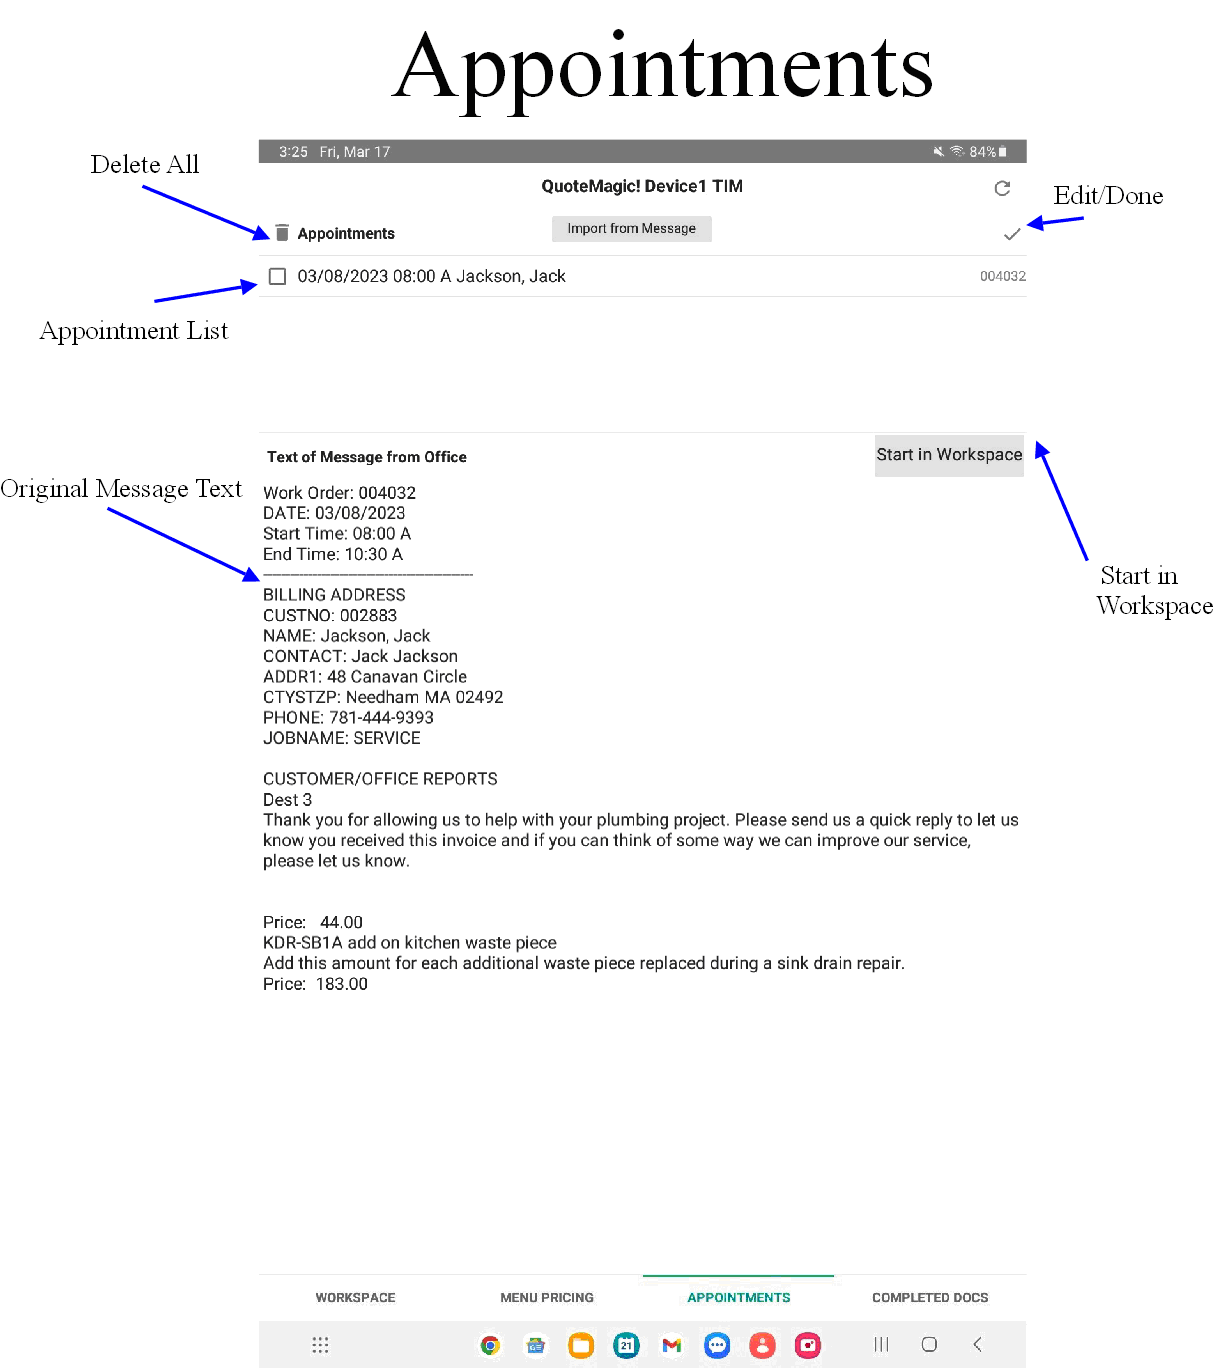
Appointments List
- Scrollable list shows date, start time, customer name and work
order number of each appointment. Tap the appointment to select
it.
Edit - Allows a single appointment to be erased, shows
the Delete All button.
Delete all Appointments - removes all appointments from
the list.
Import from Message - Opens Copy message and paste dialog to add
appointments sent from the office.
Text of Message - Displays the entire text of the scheduling
message associated with the appointment. Scheduling messages are
sent to the tablet from the PricePoint desktop scheduling software.
Start in Workspace - Places customer and job location from
appointment into the workspace. The function attempts to add any
tasks present in the message to the workspace. The work order
number shown in the appointment will be carried over to the invoice
when created.
 Copy
Message and Paste - Locate message in mailbox, tap body of
message and choose select all and then copy. Return to QuoteMagic!,
tap message box and tap Paste. Tap Done to process message and
create an appointment. Tap Back to cancel.
This tab includes everything you will need to complete a Time and Materials style invoice.
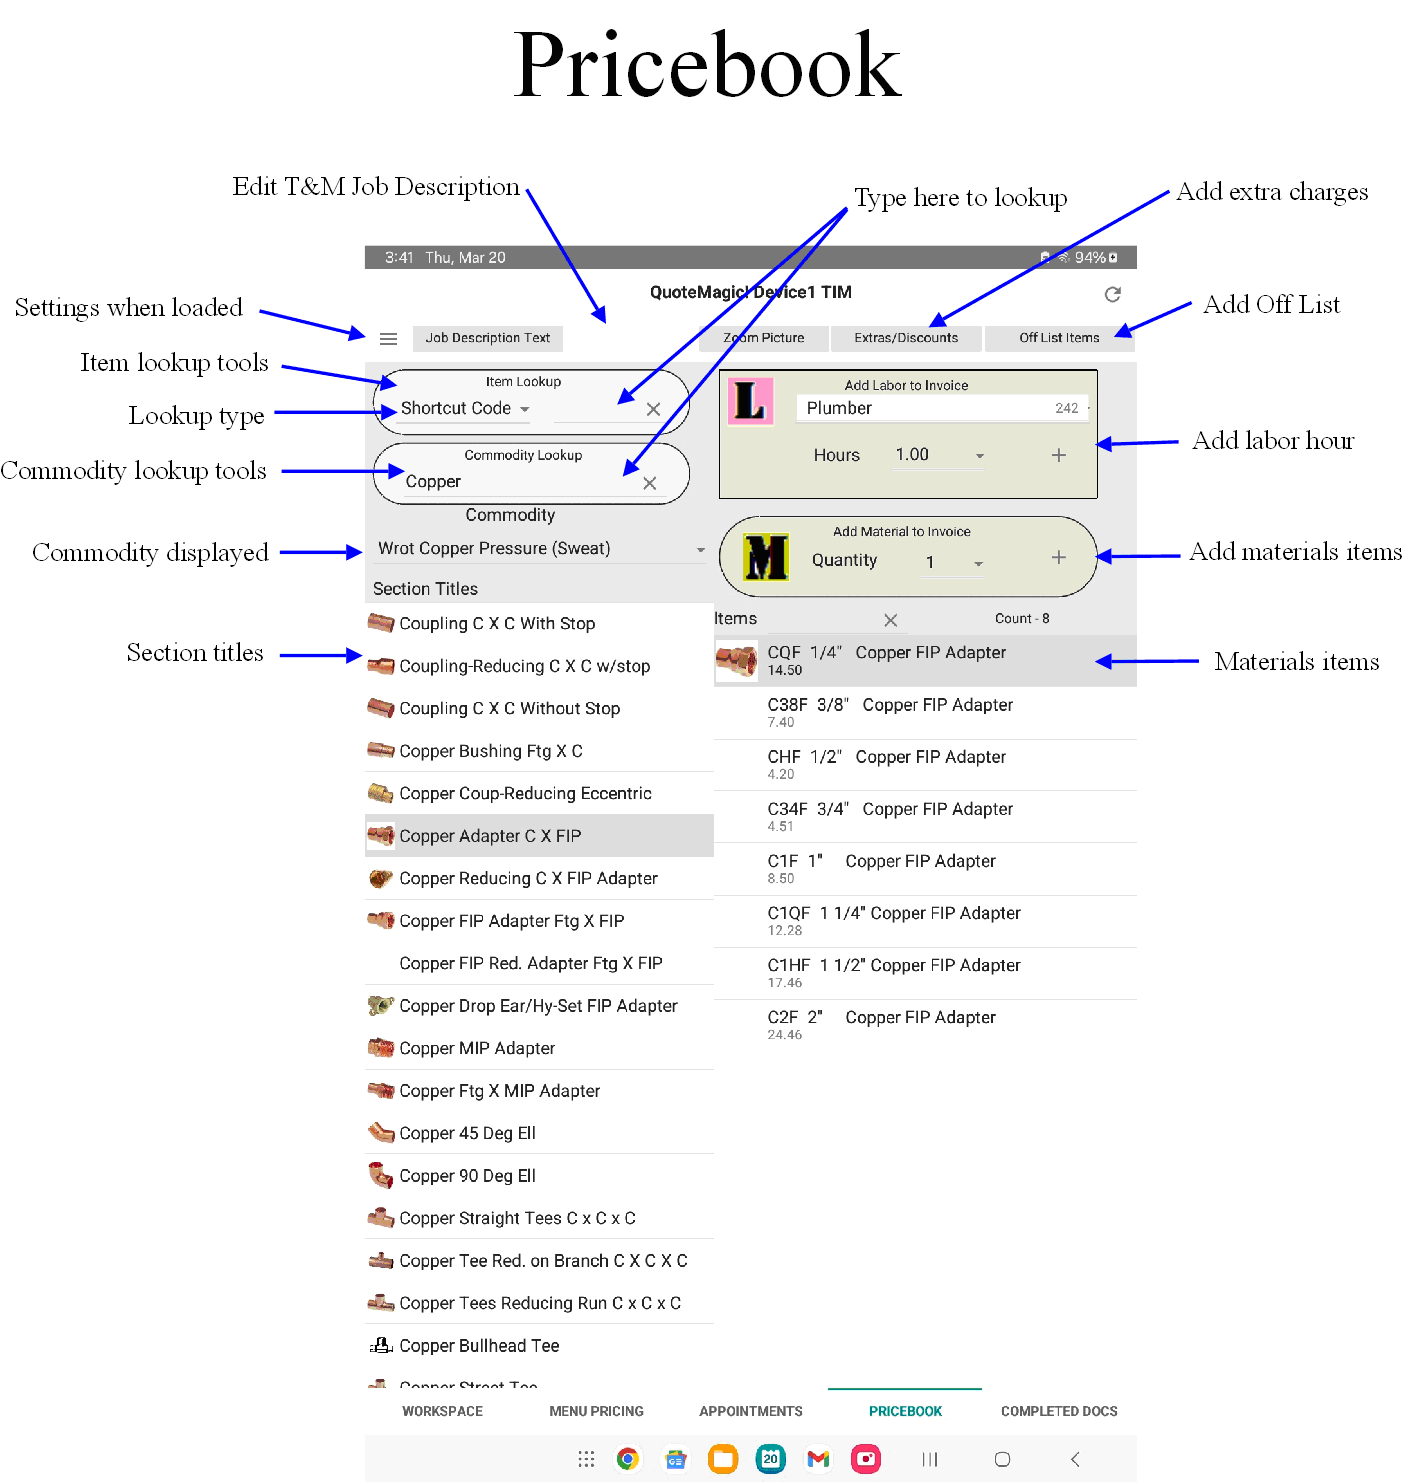
Item lookup - Use it to find an item by shortcut
code, catalog # or UPC
Commodity Lookup - Use it to narrow down the commodities list.
App will show commodities containing the word you type.
Commodity - Choose from all of the commodities by tapping. It's
a long list!
Add Labor - Set the rate and number of hours to add to your invoice.
Add Materials - Set the quantity and add the selected item to
your invoice.
Section Titles - This displays all the section titles that belong
to the selected commodity.
Materials Items - This displays all the items contained in the
selected Section.
Settings (Hamburger) - Shows the price settings
last loaded into tablet.
Job Description Text - View and edit your Time & Materials
job description.
Zoom Picture - View zoomed picture of selected item.
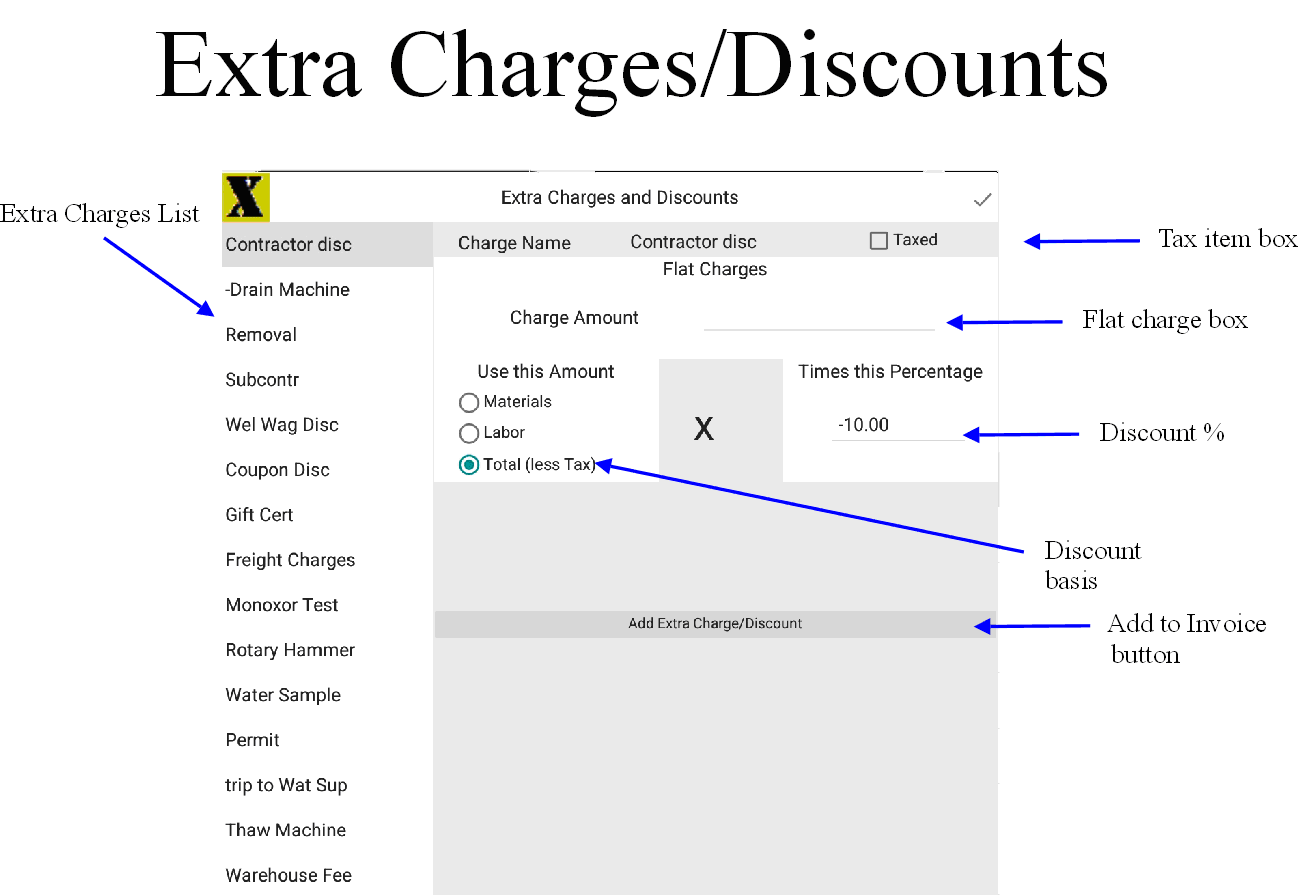
Extra Charges/Discounts - View and add extra charges and discounts to your invoice. Select an extra charge from the list and tap Add to invoice. Users can change the discount percentage or discount basis or can change amount of a flat charge before adding to invoice.
Note: changes are not saved between sessions.
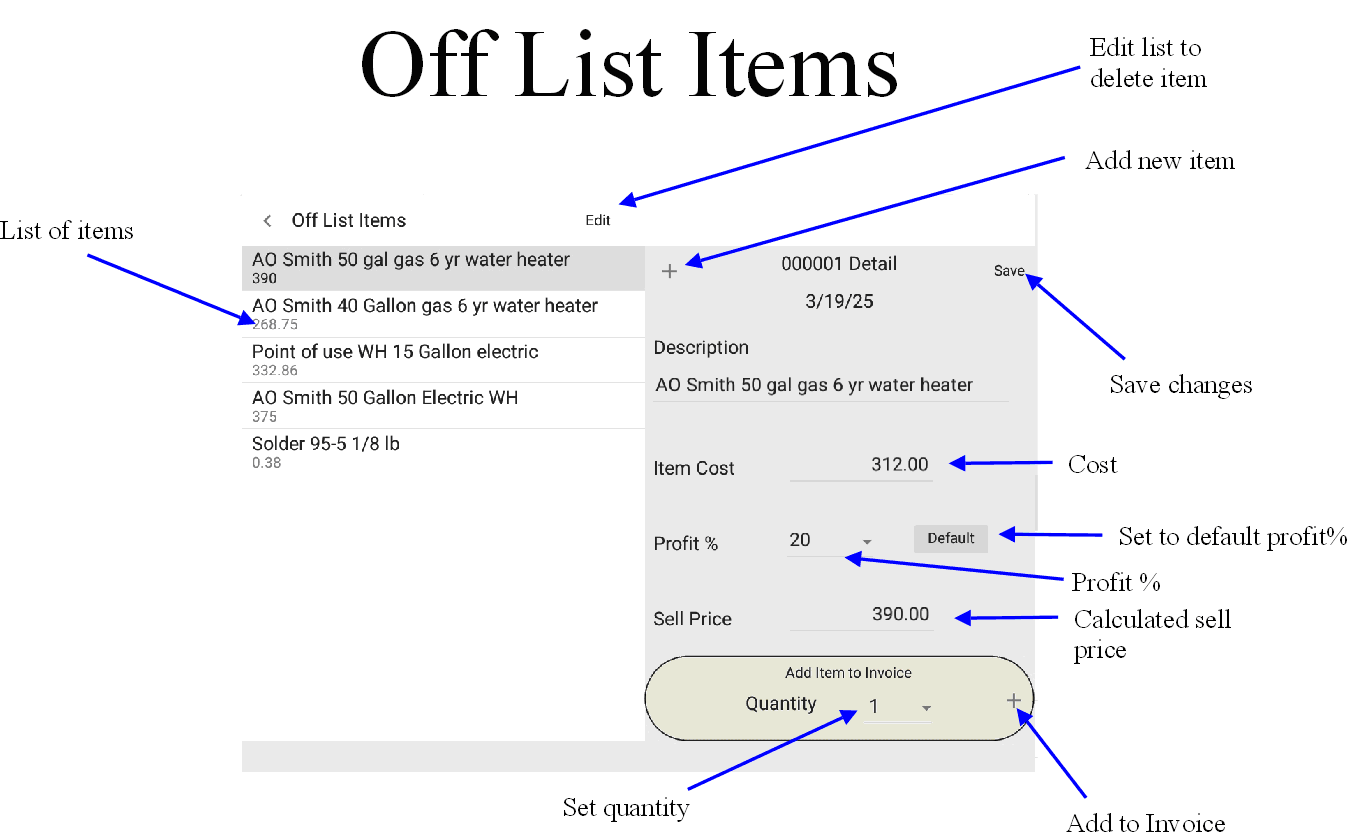
Add Off List - View, edit and create new off list items. When you open the dialog for the first time and the list has no items, the app assumes you want to add an item and puts you into new item mode. Otherwise, add new items by tapping (+). Each item has a description, cost, profit % and calculated sell price. Type in a description and the cost of the item then choose a profit percentage and the app will calculate a sell price for you. To reset the profit% to the default that was set when the device was loaded at the office, tap Default. When you are done editing, tap Save so you can then select a quantity and tap (+) in the Add Item to Invoice area.
Completed documents are invoices and payments waiting to be emailed
to the office. Documents that have already been sent to the office
are hidden by default.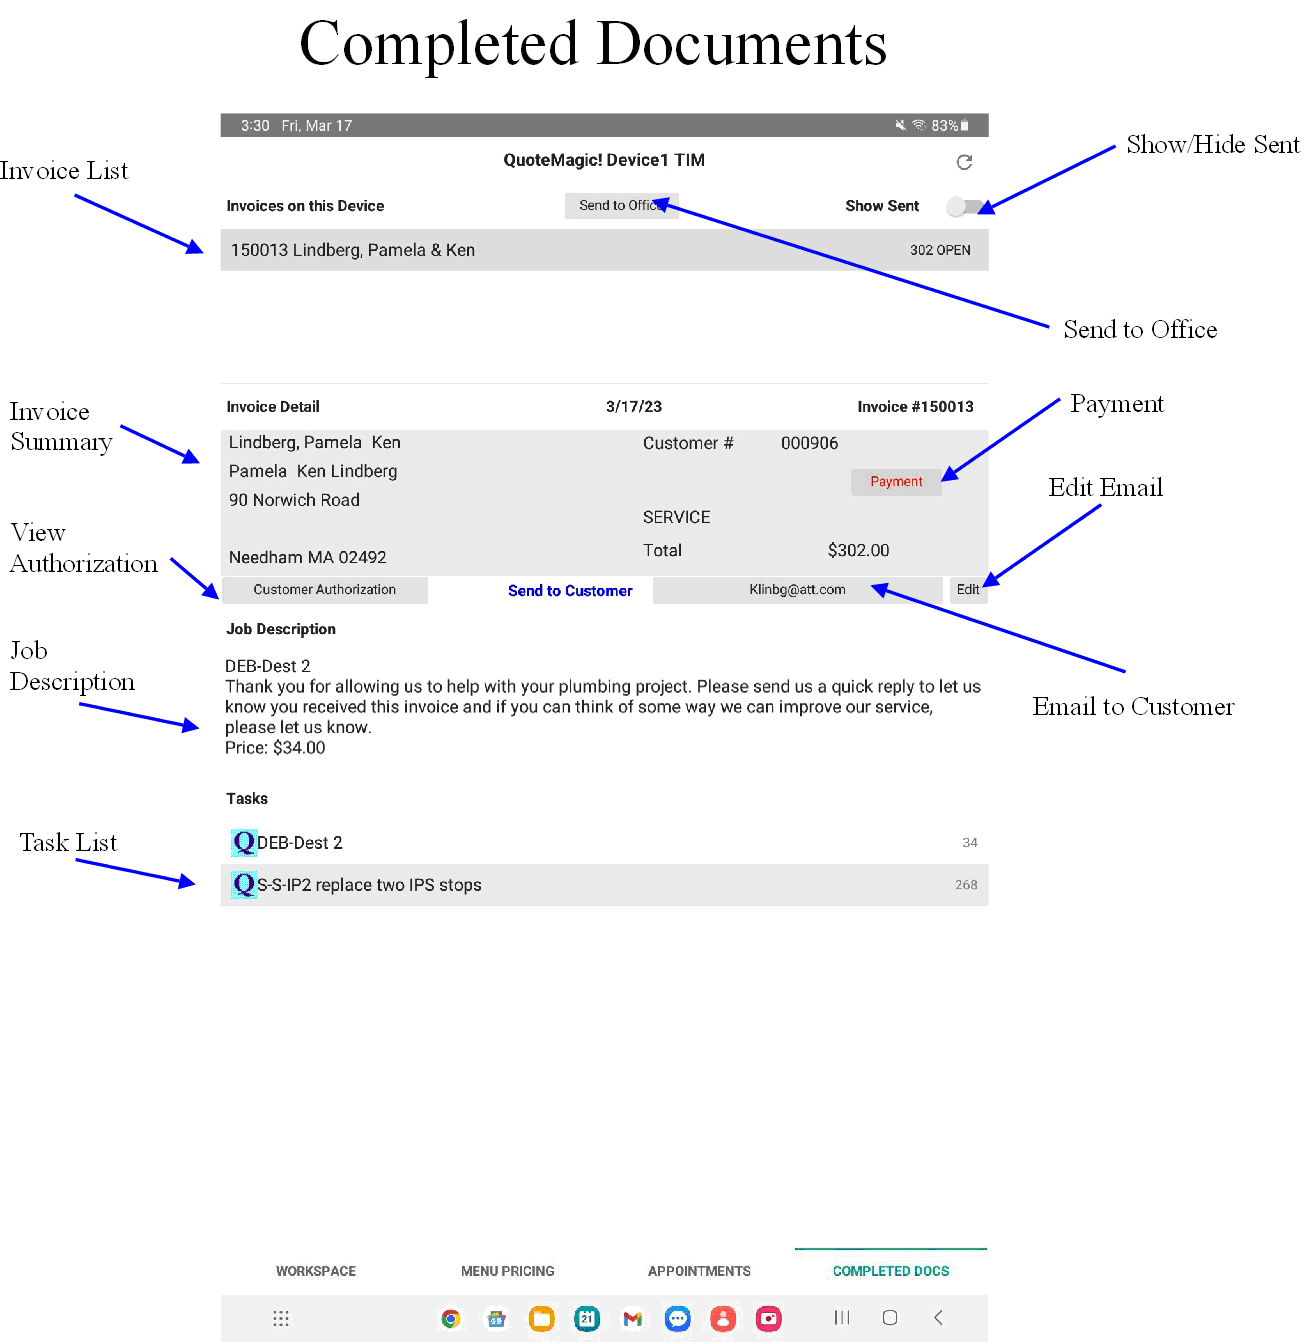
Invoice List
- Scrollable invoice list displays invoice number, customer name,
amount and status of each invoice.
Show Sent - Shows/hides sent invoices.
Customer Authorization: displays both authorization and approval
signatures.
Email to Customer - displays email address of customer
and emails invoice to customer.
Edit - Allows editing of customer email address.
Payment - Record a customer payment.
Job description - displays the job description of the selected
invoice.
Tasks - displays the tasks included in the selected invoice.
Send to Office - Packages up all new customers, customer
changes, invoices, payments and job locations and sends the package
to the office email. The PDD mail station then retrieves and adds
the data to the PricePoint software.
Edit Email Address - tap done to save new address.

Send to Office dialog - click Send to use the tablet email app
to send the attached data packet to the office.
WARNING!
DO NOT TAP THE CANCEL BUTTON IN YOUR tablet EMAIL. DOING SO WILL
RESULT IN THE LOSS OF ALL INVOICES IN THE BATCH!
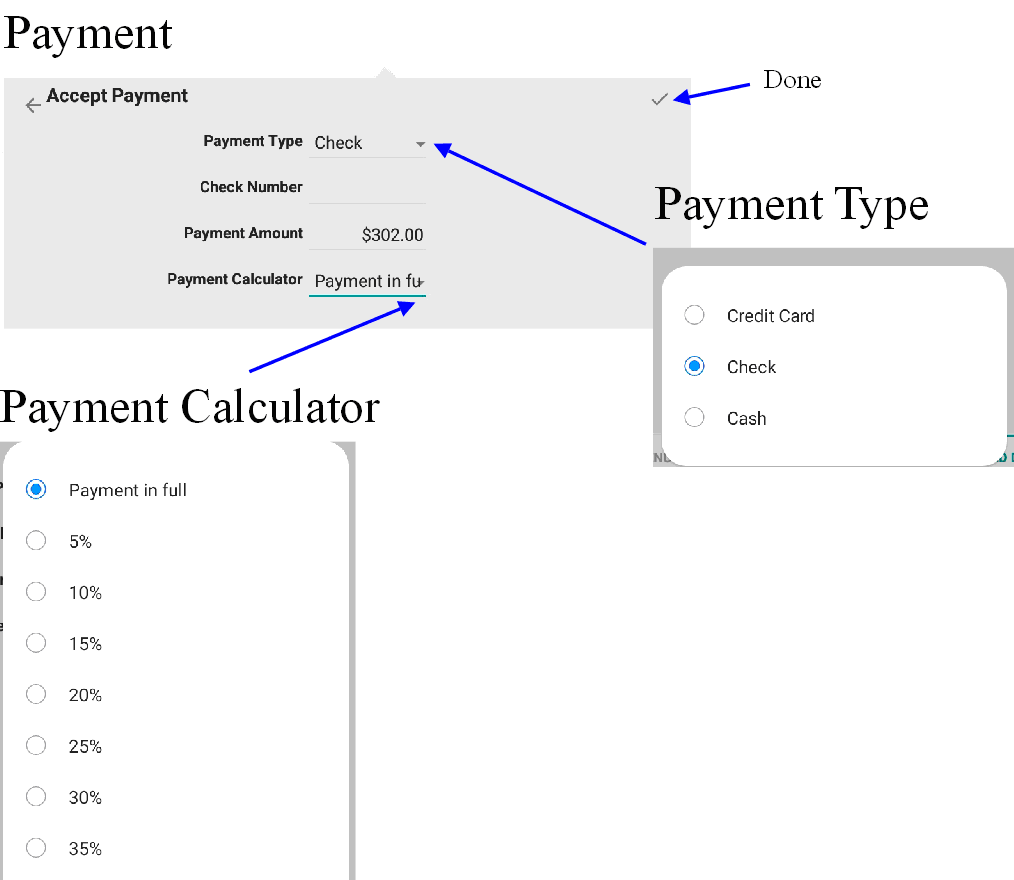
Payment dialog - select type of payment Credit card, Check or Cash. Record last 4 digits of Credit card or check number.
Email Invoice to Customer - tap button with customer's
email address to review message then click Send.

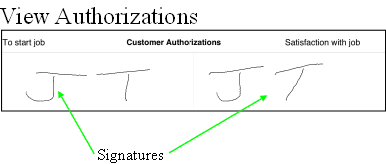
View Authorizations - Tap the signature or Hide Customer Auth to dismiss popup.
Here is a basic how to guide for QuoteMagic! for tablet. Let's run through the basics you'll need to know to put QuoteMagic! through its paces.
From the Workspace tab tap Customer. In the alpha search box type the first few letters of the customer's last name and pick customer from the list by selecting the name and tapping Use Customer. The customer name and address should now show in the top of the workspace tab.
Note: You may edit the customer's phone, email address and customer notes as necessary (See Advanced Topics - Editing Customer Data). Note: If your dispatcher sends your appointments to you, select the appointment in the appointments tab and tap Start in workspace (see Advanced Topic - Appointments).
Tap Menu Pricing tab, tap the Page titles list (top right) and
select the title of the page containing the desired task and tap
Done. Tap the task in the list so that it is highlighted (check
that the job description of the task is showing in the box at
the bottom). Change the Multiple if necessary and tap Add to Workspace.
Tap the workspace tab to see that the task was added to the workspace.
Tap Pricebook tab to access materials, labor and other items.
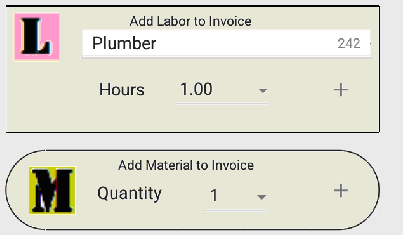
To add labor to workspace, select a labor rate,
the number of hours and click (+).
To add a materials item to workspace, select an item in the Items
list, select a quantity and click the (+) button in add material.
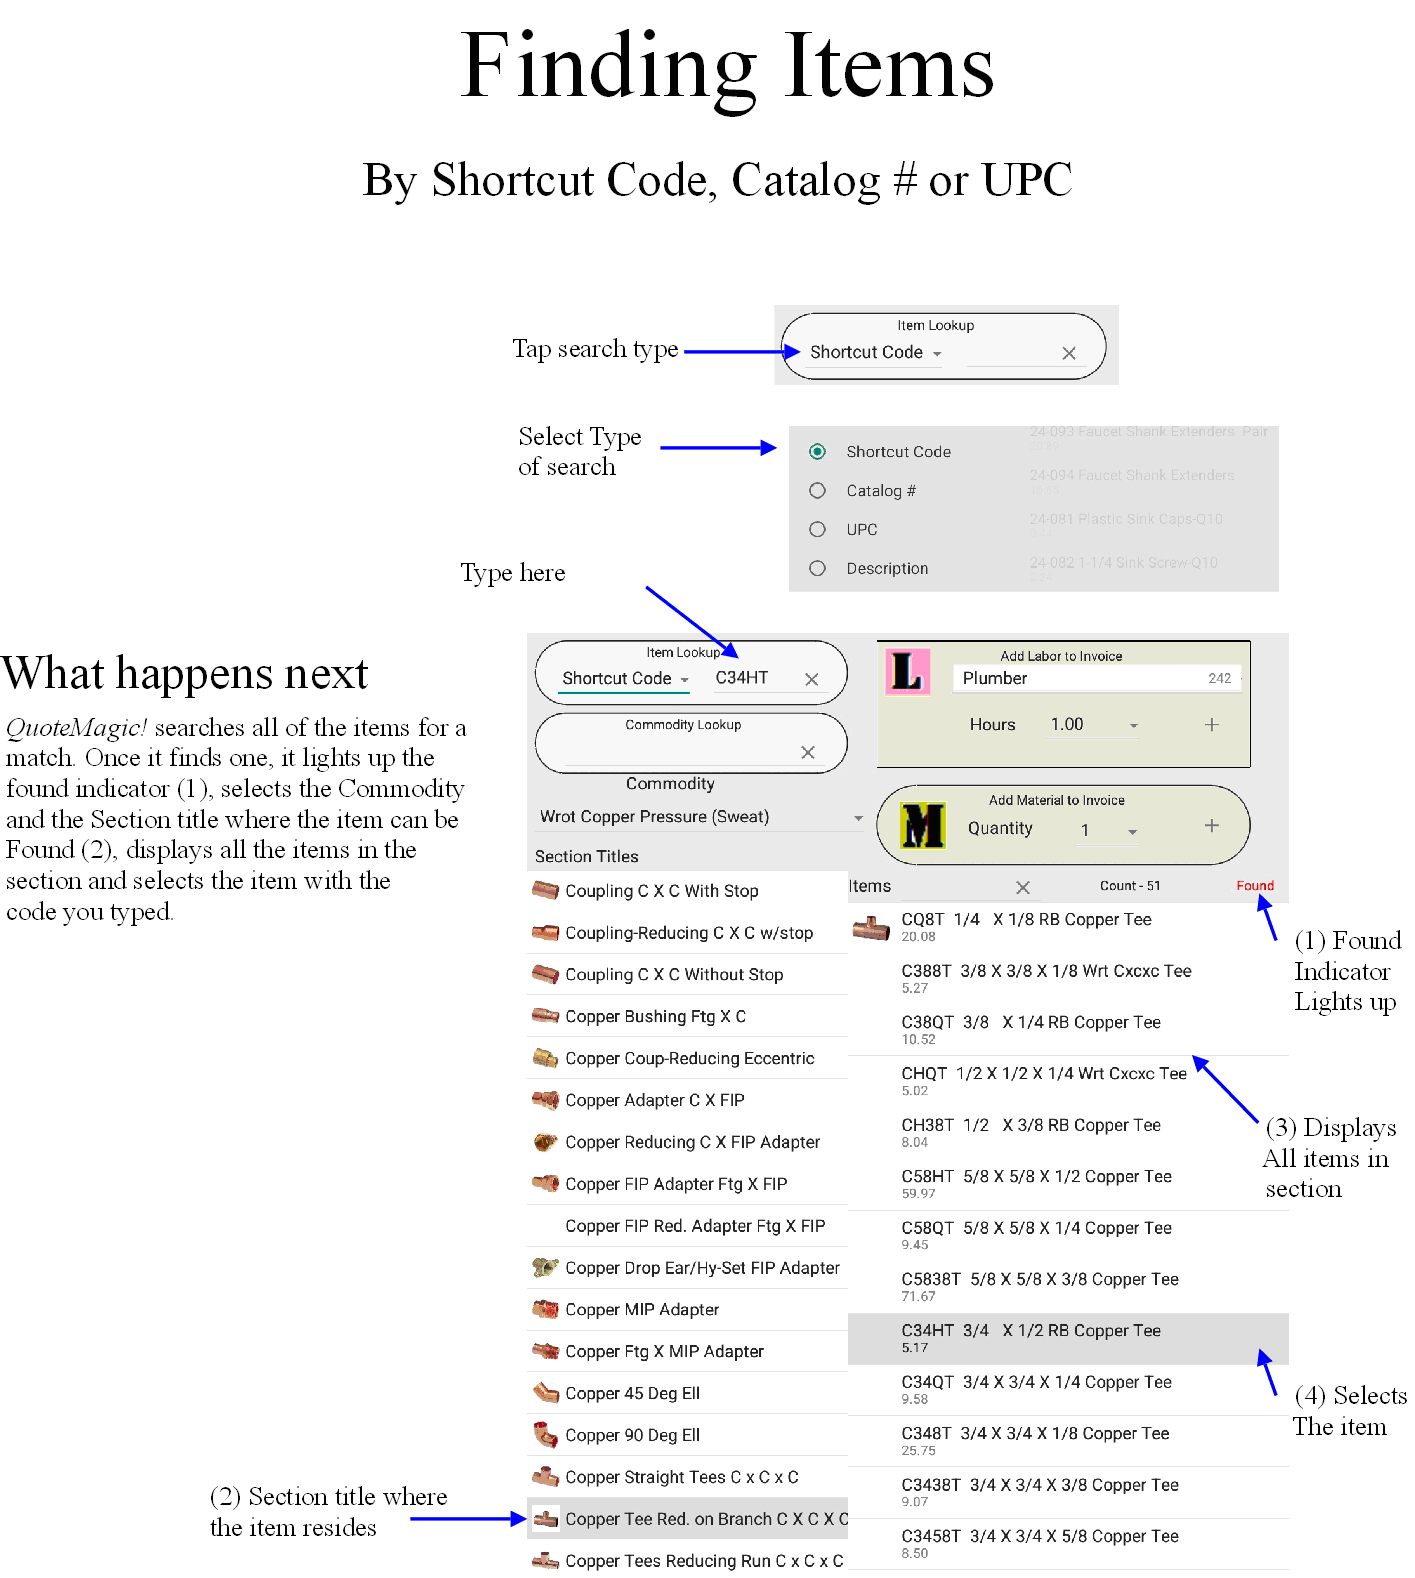
Let's look at the various ways we can find the items we need.
If you are familiar with the shortcut codes
type the code into the item lookup box and watch as the app finds
and selects the item. The app can also search by catalog # or
UPC. Please refer to the illustration below for a step by step
explanation.
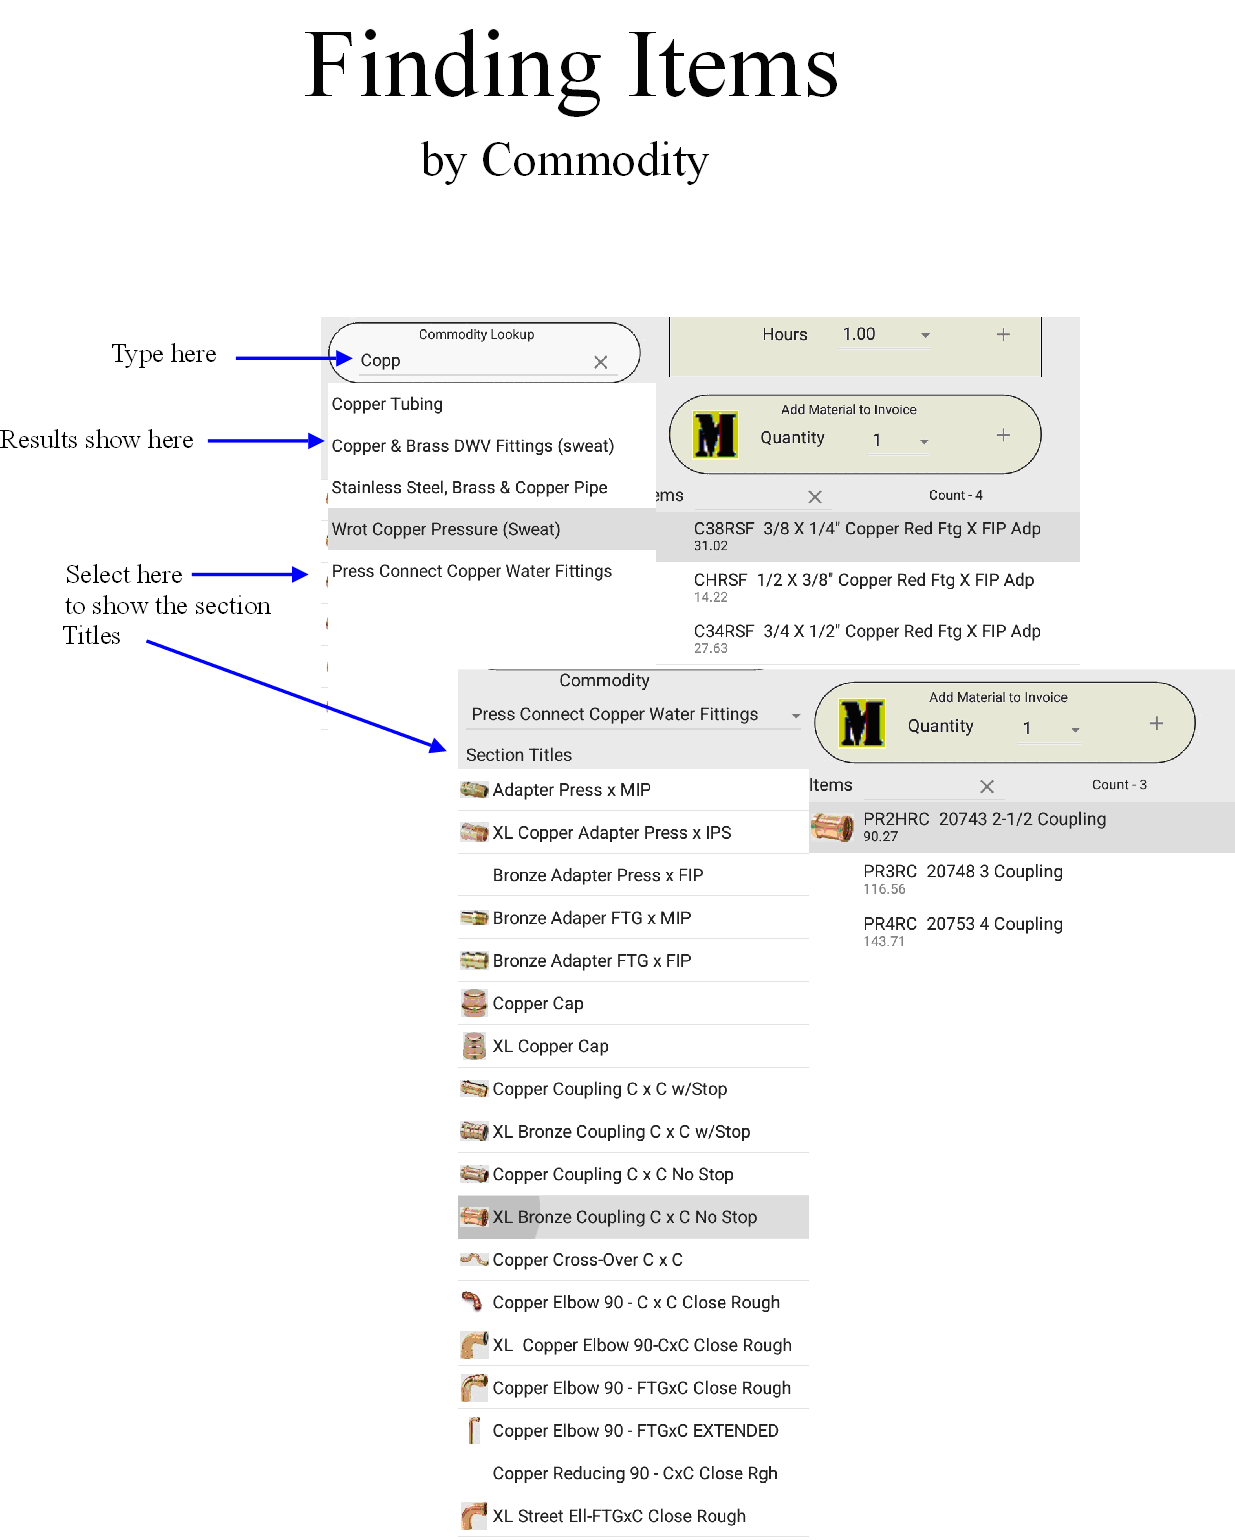
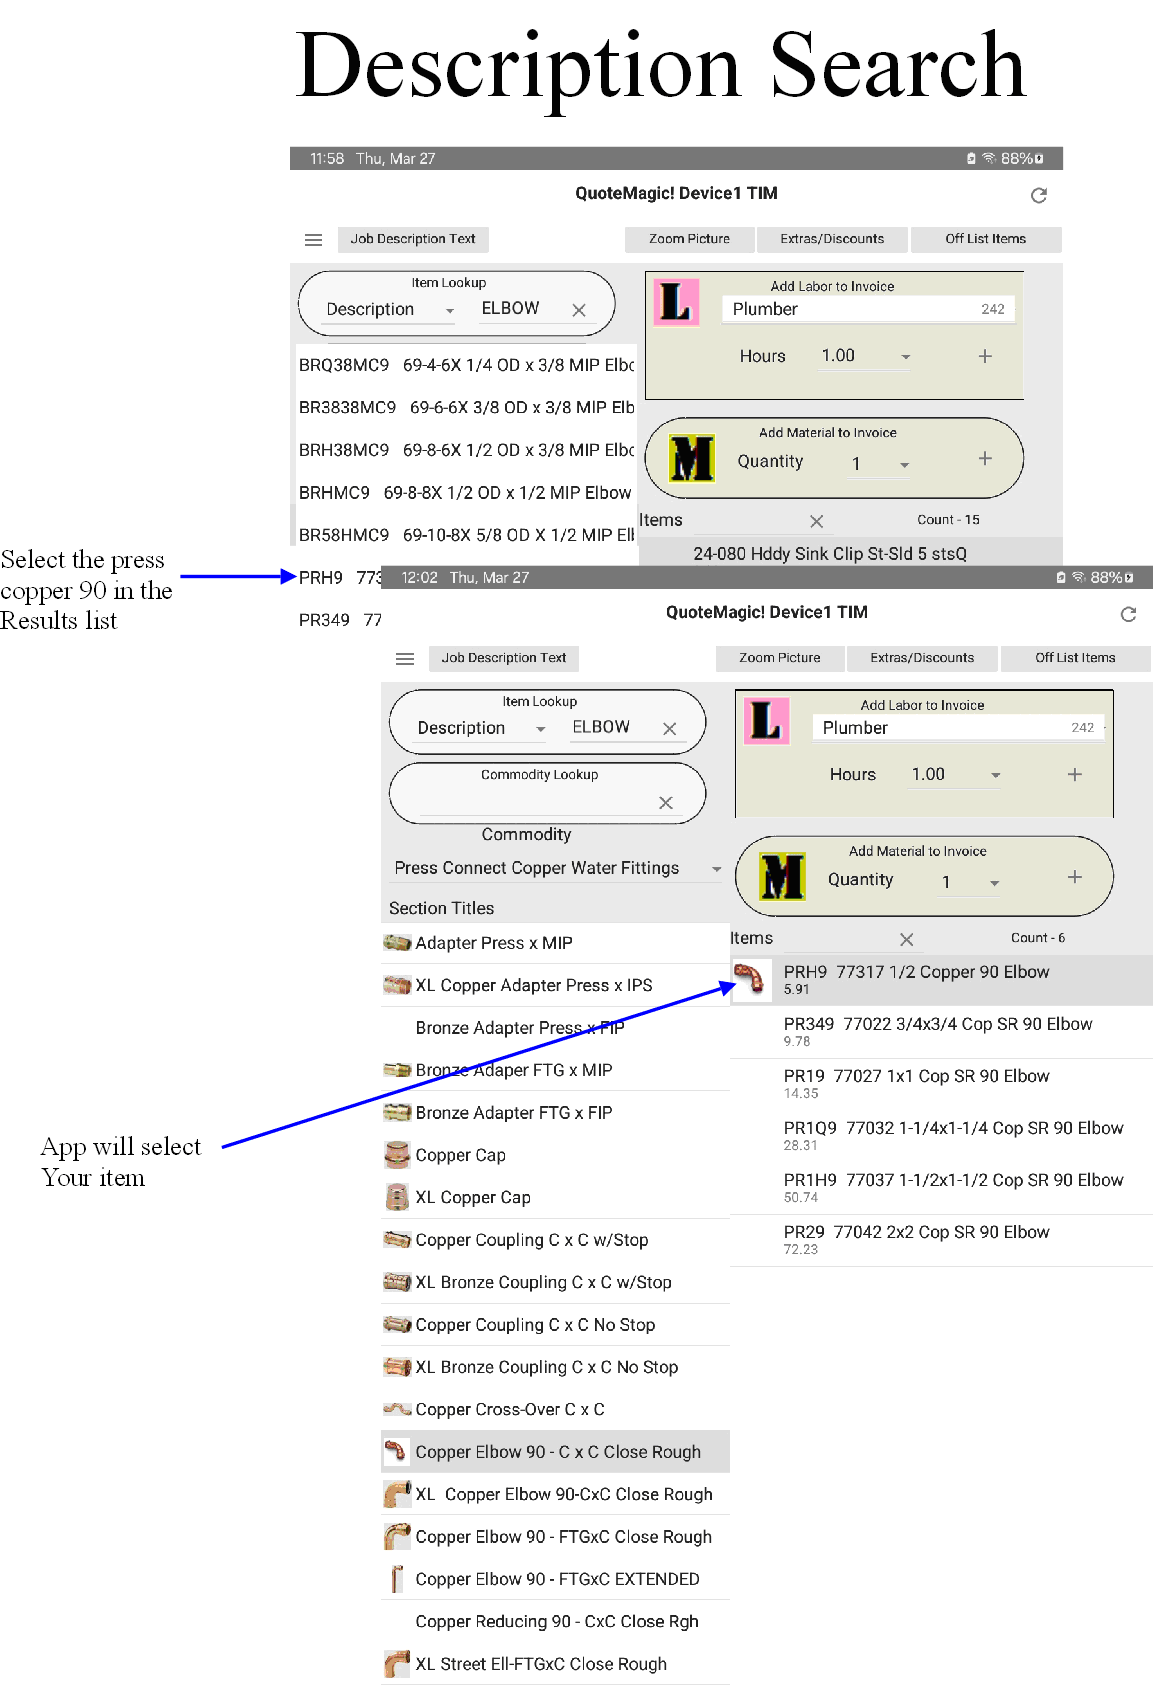
Narrowing a search by commodity is as simple
as typing in the Commodity search box. As soon as you start typing,
all of the commodities containing your search will display in
a list directly below. Select the commodity you want by slow tap
(tap and hold) and the Section titles will display. The illustration
below shows an example of typing 'Copper' into Commodity Search
Tap search type and select Description. The type 'elbow' to see a list of items that include the word elbow in their descriptions in the list below. The list is limited to only the first 25 items to conserve memory so this is not the best way to search for common items like elbows but you get the idea.
Section Titles Items Search - Once you have selected the section title you may find that the items list is too long to reasonably find an item.
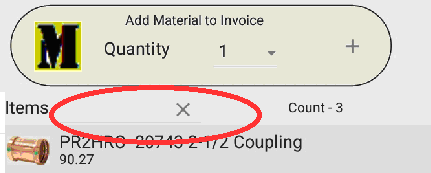
The search box for this is in the Items header just to the left of the word 'Count -'. Type anything into this control to locate the item.
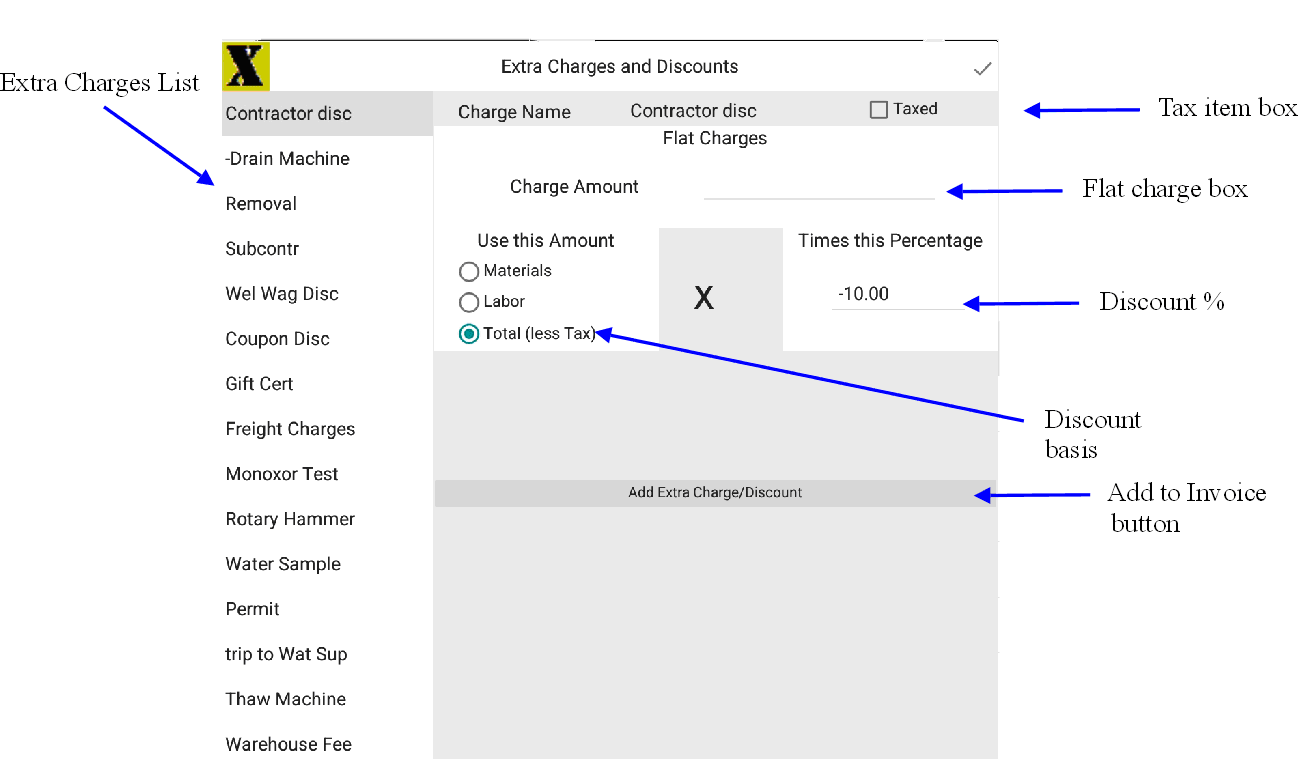
Tap Extra Charges/Discounts button. Choose Extra Charge/Discount and tap Add Extra Charge. The dialog will close when you add the item or tap Extra Charges/Discounts button again. Alternately close it by tapping done.
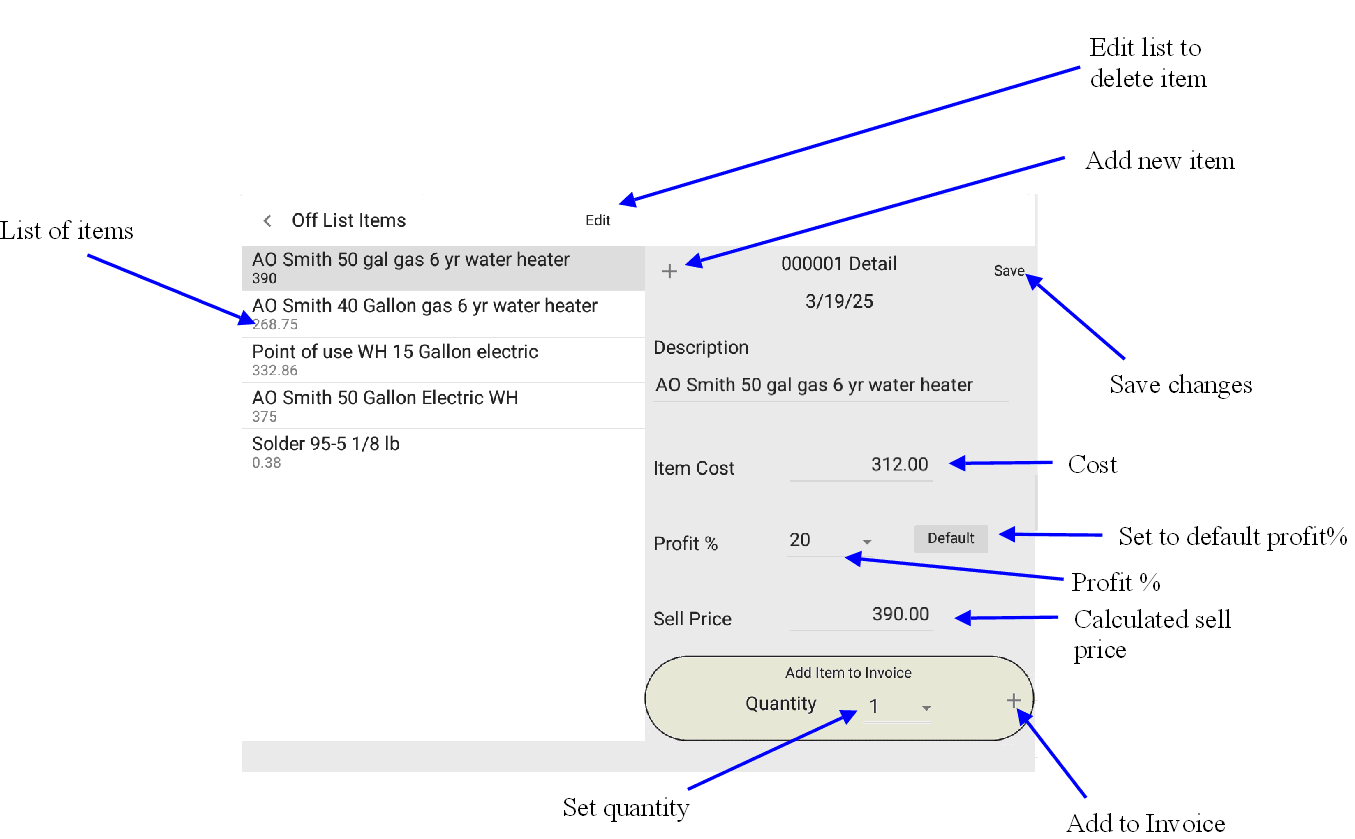
Tap off list items button. Choose the off list item, select a quantity and tap (+). To close dialog tap off list items button again or indicate you are done by tapping back.
On the workspace tab, tap Get Authorization to start job. Ask the customer to tap the Agree checkbox, sign in the white rectangle and tap Accept. You are now authorized to begin work.
On the workspace tab, tap Job is Complete. Again, ask the customer to tap the Agree checkbox, sign in the white rectangle and tap Accept. QuoteMagic! switches to the Completed Documents tab and shows the completed invoice. The job is now complete, you are now ready to accept payment.
QuoteMagic! can record payments via Credit Card (using Amazon Local Register or Square), check or cash. From the Completed Documents tab, select the invoice in the list and tap the Red Payment button.
Payment can be recorded for the full amount of the invoice or a percentage of the total, in the case of insurance work. To record a percentage payment tap payment calculator and choose the applicable percentage and tap Done.
Tap the payment type box and choose Credit Card. Tap the last 4 digits box and type in the last 4 digits of the customer's card then start ALR or Square software making sure that the payment amount agrees with the amount shown in QuoteMagic!. Make a note of the transaction code and record that in the transaction code box. Tap Done.
Tap the payment type box and choose Check or Cash. Tap check number box and record check number. Tap Done.
Click on the large button to the right of Send to Customer that shows the customer's email. If the button only shows as "Email", tapping it will show a message asking if you want to enter an email for this customer. Once an email address has been entered, tapping the button will show the Email to customer dialog with the text of the invoice ready to send. Tap the Action button at bottom left to show the text in your email app and then tap Send.
You must be connected to the internet before you can complete this step. At the end of your shift, tap the Completed Documents tab and tap Send to Office to display the email app with the message composed and ready. This email message contains the batch of invoices, payments and changes made on the tablet up to this point in time. Now you MUST tap the Send button to send the batch to the office (see warning below). Mail Station can then connect and import them into the PricePoint software. The invoices in completed documents should now be hidden as they have all been sent, unless the Show Hidden switch is set on.
Any task in the Menu Pricing tab can be customized
BEFORE it is added to the workspace. On the Menu Pricing tab at
the bottom next to the task description, tap Customize ![]() to bring up the Custom task dialog. To add a specific amount to
the task price, tap the ADD $$ box, type in the added amount,
and tap +. To customize the task job description, type in the
text box provided. Tap Add to Workspace when you are finished.
to bring up the Custom task dialog. To add a specific amount to
the task price, tap the ADD $$ box, type in the added amount,
and tap +. To customize the task job description, type in the
text box provided. Tap Add to Workspace when you are finished.
The customer list in your tablet is the same as that found in your PricePoint software so it has the potential to be really big! You can't just scroll through the customer list to find a name because QuoteMagic! will show a maximum of 100 customer names to avoid memory issues on your tablet. You should start by tapping the alpha search and typing the first few letters of the last name to narrow your search. If that doesn't show the correct name, tap Advanced and search within the name, address, phone numbers or by customer number. Select the type of search, type in a string of letters in the InString search box and tap search. When you have found the correct customer, tap Advanced to hide the extra options.
Note: Advanced searches are very powerful because they look for the letters you entered WITHIN the selected customer fields. For instance, you could search for "john" in the customer's name and the list will fill with all the instances of john in your customer list.The easiest way to start a job in the workspace is from the Appointments tab. Tap the Appointments tab and select the desired appointment. Then tap Start in Workspace. The tab changes to the workspace and should now show the customer info and the workspace should be loaded with any tasks that were included in the message.
Appointments come from the PricePoint desktop software as a scheduling message that goes to your mailbox on the tablet. The mailbox item will always include "Your Schedule Message" in the subject line. When you receive a scheduling message from the office, open the message, tap and hold until you see the magnifier then lift your finger and tap Select All then tap Copy. Press the home button and open PricePoint and tap the Appointments tab and tap Import from Message. Now tap and hold inside the white text box until you see the magnifier and then tap Paste. Tap Done to create your appointment(s). Your Schedule message may contain more than one appointment. If the schedule message contained special instructions from the dispatcher, please refer to the schedule message that is still in your mailbox.
Customer data can be edited on the tablet and the changes will be received after tapping Send to Office.
Once the customer is placed in the workspace, the customer's address and email may be edited by tapping Edit Customer then tapping Save Customer.
With the customer in the workspace, tap Edit Customer Note and tap Done to record any changes. Tap Insert Date Stamp to place a date stamp and the cursor at the top of the customer note.
Note: Inserting a date stamp and keeping your edits at the top of the list is a smart way to preserve the important history stored in a customer note. Avoid overwriting or deleting existing customer note information. If you are unsure of your edits, tap Back and start over!Updates will become available through Google Play store from time to time.
DO NOT INSTALL UPDATES AWAY FROM THE OFFICE.
ALL DATA ON THE DEVICE WILL BE ERASED when the update is installed on the device. You will need to have your setup reloaded while connected to Device Desktop computer. Be absolutely sure that all of your data has been sent to the office before installing the update or you will lose valuable information!